
Hello all!
I’ve been reflecting lately on the effect that a physical place can have on one’s happiness and creativity. In our last abode, Eric and I had loads of space, but we didn’t use it. I was not very motivated to create anything new and, to be honest, it wasn’t in the best of neighborhoods. If he had freelance work to do, he was in his office at one end of the house, and I would watch TV or a movie or read a book in the living room at the other end of the house.
In our current house, we have much less space in terms of square feet, but we use it so much more effectively. I have been working out at home, which I never did before. I’ve been baking more and delving further into my passions of writing and photography. We spend more quality time together too. Just last week, Eric hooked up our turntable and we raided my father’s record collection. Instead of turning on the TV in the evening, we put on a record, talk and sing and get all mushy and annoying. It’s been fantastic.
I say all this to say that listening to vinyl, specifically vinyl that I heard often as a kid, has got me aching to make delicious things from my childhood. I set aside some time yesterday and decided to make my favorite bread: challah

For as long as I can remember, there was always flour flying in my mother’s kitchen. She is an incredible baker and I learned so much from her in the way of technique as well as intuition. This is something she made for every special occasion I can recall when I was a child. She usually made the dough and then formed them into knots to make lots of rolls. If we were lucky, she made a big braid like this. It was always a moment when she brought it to the table. We all knew the kind of time it took, and it was always worth the wait. This bread will warm your heart and make your house smell absolutely delightful.
Also, if you have a beloved you wish to impress, this is so so so the way to their heart. Just sayin’. They will knead you in their lives forever!
See what I did there? 🙂
First! Gather the ingredients!

Here we have 5 cups of unbleached all purpose flour-measured then sifted. Sifting helps to eliminate clumps in the flour and also helps the rest of the ingredients to be combined quicker. If the flour is all thick and clumpy, it can take a little longer to incorporate the wet ingredients. This can cause you to, unknowingly, overwork the dough which can result in a tough braid. No bueno.
Also, you must have 2 Tbsp dry active yeast, 2 tsp salt, 2 eggs and 1 extra yolk (hold up don’t toss the white), 1 egg white for an egg wash, 1/4 cup honey, and 1/4 cup vegetable oil. You absolutely can do all of this with a wooden spoon, a big bowl, elbow grease and a stubborn streak, but I swear by my standing mixer, Carmelita. She has more stubbornness than I do and I’m a Taurus.
Next, prepare your yeast. *Disclaimer: I’m gonna nerd out about yeast now.*
I got 1 1/2 cups of water and heated it in a Pyrex measuring cup until it was between 100° and 110°. If you make it a little on the hot side at first, pop an ice cube in it until it comes down to the right temp. I used a meat thermometer to monitor this process. It’s very important to get the temperature of the water right. If the water is too hot, it will kill the yeast and you won’t get a rise in your dough. If the water is too cold, the yeast won’t activate at all and, again, you won’t get a rise. Remember, your dry yeast is a living thing, it is just dehydrated. Treat your yeast nicely and it will return the love.
When your water is the right temperature, sprinkle the yeast on top of the water. Then add a healthy pinch of plain old regular sugar. This wakes up and feeds the yeast. I just stir it a bit with my hand to make sure everything is mixed up and the yeast is happy. When you get some bubbles at the top and a little froth, you know the yeast is activated and ready for use.

Once this has been achieved, set it aside.
Next, in a large bowl or the bowl of your standing mixer, whisk together the sifted flour and the salt.

After the salt and flour have been whisked together, switch to your paddle attachment. Its got more umph to it, which you need once you start adding the wet ingredients.
Put the paddle attachment on, lower it into your bowl, and turn it on low. Keep it going the entire time you are adding the wet ingredients. As the dough gets stickier, feel free to turn the speed up one or two notches. Don’t go too crazy though, or you’ll have flour all over your kitchen. Trust. Me.
If you are doing this bit by hand, get your sturdiest wooden spoon and go for it. When your biceps and forearms burn and yell at you, you just tell them to shut up and that they should be grateful for the workout.
Add the eggs, extra egg yolk, vegetable oil, and honey. The honey might give you a bit of trouble. It is honey after all. Keep at it. This is the only bit that sweetens and flavors the bread besides the fermentation of the yeast. It’s important to get as much of that 1/4 cup in the mixing bowl as possible.
Finally, add the activated yeast. This is where you will see a big change in your dough. It will all of a sudden look and smell like, well, like dough. You are hoping to see a big, sticky, wet ball. When you raise your paddle out of the bowl, whatever is on the paddle should stay on the paddle, but the rest of the dough will not come with it.

Now, I switch to my dough hook. Yes. This is the part where we use the dough hook. Hooray!
Lower the dough hook into the bowl and turn the speed on medium high, and let it do its thing until all the ingredients are well combined and the dough forms one big ball. It will be rolling around the bowl in one big sticky mass but as it moves around the bowl, none of it will be sticking to the sides.

Now the super fun part. It’s my favorite part. It’s the part that is absolutely worth the time and effort. The knead!
Soapbox. My mom also has a standing mixer. I asked her, “Do you use your dough hook to knead your bread? How long do you let it go?” She said, “Why would I use the dough hook? The kneading is the best part!” To be clear: You can use your dough hook to knead the bread for you. If you have bad hands or an injured wrist, or if you have other things you have to do for those 10 minutes, you can absolutely have the machine do the work for you. No judgement. No hate. I personally, really enjoy kneading. When you have had a rough day, its very therapeutic and cheaper than a kickboxing class. I also feel like when you use your hands, you are more connected to what you are making and have a better idea of when it is ready. You do you, but I will always advocate for hand kneading if possible. End Soapbox.
Turn the dough out onto a clean, very well floured surface. Push the dough away from you with the heels of your hands, then pull it toward you and fold it over on itself. Push and pull. Away and toward. Repeat, repeat, repeat.

The dough will be very sticky. That’s good. If it gets too sticky to stay in one mass, sprinkle more flour on your surface and on top of the dough. I knead challah for 10 solid minutes. I find that the time goes by faster with music. Norah Jones is good kneading music. You know it is done when it becomes soft, supple and can hold its shape as a smooth ball.

Its not as smooth as Kate Moss’s skin or anything, but it is certainly smoother than it was before kneading.
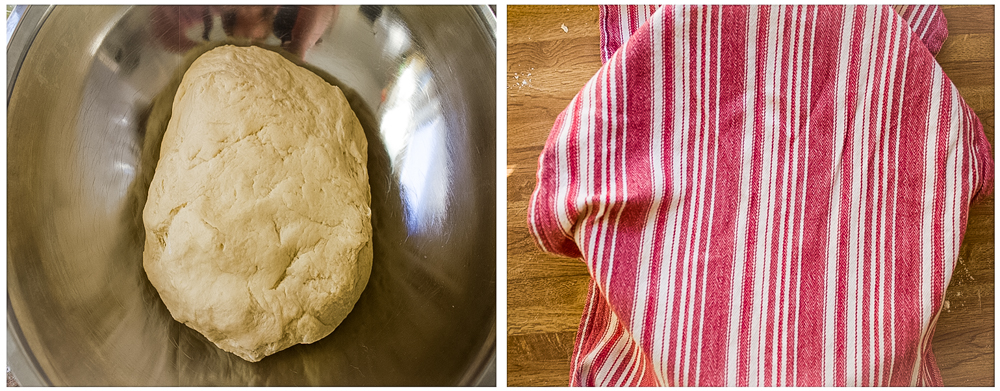
Now, lightly grease a large bowl, place this ball in the bowl, and cover it with a clean, dry towel. Let it rise for one hour. It will about double in size during this time. The rising time is to allow the yeast to do its thing and release all that wonderful carbon dioxide that gives us big beautiful bread.
Now you can clean the kitchen. Or catch up on your favorite guilty pleasure show. Or take a nap. It’s your life, I’m just adding carbs to it.
Ok. So it’s been an hour. Uncover the dough.

It’s all big now! Let’s braid!
This can be done many many ways. I chose a six strand braid, which means I’m a masochist. You can do this with anywhere from 3-6 strands. With three strands, it is like braiding someone’s hair. After that it gets a bit more complex.
In any case, you are going to split the dough into as many evenly sized balls as you are going to have strands. I have six balls because I am making six strands. Next, you carefully work the balls into ropes. The ropes should be about 12 inches long and as even in width all the way through as you can make them. This can be difficult. Just keep at it. Once you have all your ropes, you are ready to braid. If you are using six ropes to make your braid, follow this video. It is a wonderful tutorial on how braid a lovely challah.

Once your braid is finished, place it on a baking sheet lined with parchment paper and cover it again with the same towel you used for the first rise.
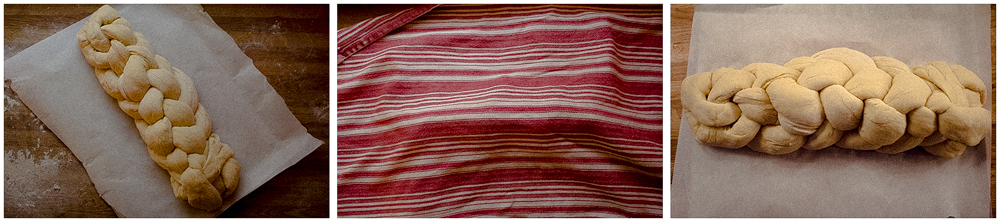
The second rise is only 20 minutes. I used to let my second rise go for up to an hour which resulted in a MASSIVE braid that would never bake all the way through. Twenty minutes is really all you need and then your dough doesn’t become unwieldy. During this rise, preheat your oven to 350°. After the second rise is complete, find that egg white we have had for this entire time. Add a teaspoon of cold water and whisk to create a wash. Brush this egg wash all over your braid. Be sure to get into the creases of the braid, and don’t forget to brush the base of the braid as well.


Ooooo….shiny!
Double check to make sure your oven has preheated to exactly 350°. I use an oven thermometer to be extra precise with my temperature, but if you have an oven that is newer than my lovely Rosie, you might not need one. As soon as the oven has reached the desired temperature bake for 40 minutes, turning the baking sheet halfway through the process.
DING! Time’s up!
Pull the bread out of the oven and place the entire baking sheet on a cooling rack. Cover the bread and let it rest until it has cooled completely. The bread will continue to cook during this process but keeping it out of the oven ensures it won’t dry out.
Voila!


That is how we challah. My mom says this is just a simple egg bread, but to me, it is so much more. It means family and good times are ahead. It’s worth every bit of time and all the work you put in. Hope you enjoy!
Nosh on!
Ingredients
5 cups Unbleached all purpose flour- sifted
2 Tbsp Active dry yeast
2 tsp salt
1 1/2 cups water- heated to between 100-110°
1/4 cup honey
1/4 cup vegetable oil
2 eggs + 1 egg yolk
1 egg white
Instructions
- Measure flour and sift into the bowl of a standing mixer
- Prepare yeast. Add yeast to heated water. Add a pinch of sugar. Stir to combine. When froth has formed, yeast is prepared. Set aside
- Add salt to flour and whisk together until combined.
- Change to paddle attachment on standing mixer.
- Turn mixer on low speed and add the honey, vegetable oil, eggs, egg yolk and prepared yeast.
- When all are combined, stop mixing and change to dough hook attachment on standing mixer.
- Mix on medium speed until all ingredients are well incorporated and the dough forms one ball that pulls away from the bowl of the mixer.
- Turn dough out onto a well floured surface.
- Knead for 10 minutes.
- Place dough in a lightly oiled bowl and cover with a clean dry towel. Let rise for 1 hour, until dough has doubled in size.
- Split into six evenly sized balls. Shape balls into evenly sized ropes.
- Braid ropes to make a loaf like shape.
- Preheat oven to 350°
- Place on a baking sheet lined with parchment paper. Cover with a towel and let rise for 20 minutes.
- Bake for 40 minutes, turning halfway through baking.
- Take out of the oven and place entire baking sheet onto a cooling rack.
- Cover and let braid rest until cooled completely before slicing.

Love it Jess
LikeLike